Imaging
IntelleCheck has the ability to send pdf file copies of checks, direct deposits, and BankMobile Disbursements payments to a 3rd party imaging system such as Banner Xtender. A custom script can be executed as payments are processed which can accomplish the necessary tasks for imaging.
Configuration
To access the Imaging area of IntelleCheck, click the Imaging button in the Administration menu.
Create a new template by clicking the  button and giving the template a name. This will enable all of the fields and allow configuration.
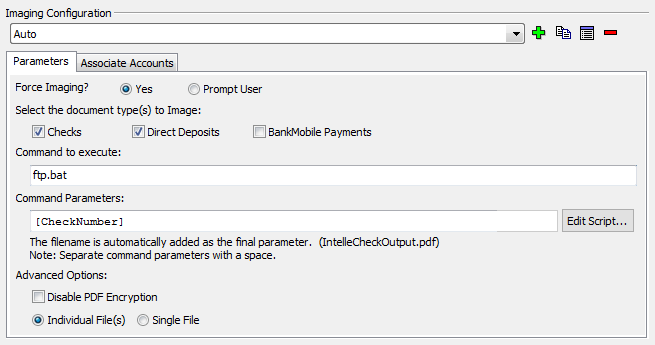
Selecting “Yes” to Force Imaging? will force imaging to happen automatically each time new payments are processed through Process Pending. Selecting “Prompt User” will allow the user to decide if the payments being processed should be imaged. When reprocessing payments, the user will always be prompted, regardless of this setting.
Select the Document Types(s) to Image allows any combination of checks, direct deposit advices, and payments from BankMobile Disbursements to be tied to the imaging layout. For example, a layout with only the “Checks” box selected for imaging would only image checks. If a user processes a batch of checks and direct deposits and selects yes for imaging, only the checks from this batch will be sent to imaging. The direct deposit advices will be ignored.
The Command to Execute is the name of a script the IT staff created. This script can ftp the file to a certain location or perform any other functionality the IT staff sees necessary. The filename entered here must reside in the Scripts directory on the server where MAPS is installed. By default, this is C:\Program Files\Evisions\MAPS\Service\Scripts
The Command Parameters field is used for any parameters for the script. Enter static variables here or access the IntelleCheck variables by clicking the ellipsis to the right of this box. A common setting is to create a script which will take a parameter in for the name of the new file, the CheckNumber, and add the [CheckNumber] variable here. If you want to use multiple command parameters, separate them with spaces. Note: Any command parameters entered when producing a single PDF file (see below) will reference the first payment in the batch.
By default, IntelleCheck will set security on the pdf files so they cannot be modified. Some imaging systems require this setting to be turned off in order for the pdfs to be added to the system. Check the Disable PDF Encryption box to turn off the encryption if problems are encountered.
Finally, choose whether you want to produce Individual Files or a Single File. If you choose Single File, each payment will appear on its own page inside a single PDF document.
After the parameters have been entered click the Associate Accounts tab. Select which account codes this layout should run against. This allows a separate imaging layout to be created for each account if necessary.
Sample Script
The following sample ftp script can be used as a starting point. This file takes in two parameters. The first is the name of the new file and the second is the file to be sent via FTP to a different server. You will need to change the values at the beginning of this script to match your institution's specific settings. If additional functionality is needed, it can be modified as desired.
@echo off
rem Evisions - FTP Script to Unix
set filename=%2
set chk_num=%1
set temp_ftp_file=temp.ftp
set log_file_from_session=YOUR_LOG_FILE_PATH
set system_name=SYSTEM_IP_ADDRESS
set login_name=YOUR_USERNAME
set login_password=YOUR_PASS
set remote_directory="YOUR_REMOTE_DIR"
rem now we will create the temp ftp file...
echo user %login_name% %login_password% > %temp_ftp_file%
rem echo %login_password% >> %temp_ftp_file%
echo cd %remote_directory% >> %temp_ftp_file%
rem still creating the temp ftp file...
echo put %filename% %chk_num%.pdf >> %temp_ftp_file%
rem change to binary mode
echo binary >> %temp_ftp_file%
echo quit >> %temp_ftp_file%
rem now we will call the temp ftp file...
ftp -n -s:%temp_ftp_file% %system_name% > %log_file_from_session% 2>&1
rem now we will delete the temp ftp file...
del %temp_ftp_file%
Testing
A good way to test imaging is to remove IntelleCheck from the equation. Save the sample script as ftpTest.bat. Then run the following from a Windows command promp, where the first parameter is the name of the destination file and the second parameter is the source file to send via ftp.
ftpTest.bat new_file old_file.pdf
This will send the “old_file.pdf” to the “system_name” in the “remote_directory” with the name of “new_file.pdf”. If the new_file.pdf is not in the directory, modify the script accordingly until it works as expected.
Once the above test is successful, the next step is to use IntelleCheck.
In the Imaging menu, enter ftp.bat as the command to execute. Include the check number in the filename by entering [CheckNumber] as the parameter. IntelleCheck will automatically add the pdf as the last parameter. When processing payments, IntelleCheck will call the ftp.bat script, add the appropriate check number as a parameter, and send the pdf to the proper system and directory.